Thursday, April 21, 2016

Multi-homed server, lock ICA and RDP to a specific NIC


We implement a multi-homed setup with Citrix Provisioning Services.  We have all of our production traffic on one NIC and all PVS traffic on a second nic.  This helps us in troubleshooting when doing packet captures but does introduce other sets of challenges.  One of these challenges is when I uninstalled and then installed updated VMWare tools on one of our vDisks it caused the NIC's to renumber and reorder themselves.  You've probably read some articles saying to 'show hidden devices' and uninstall any 'ghost' devices; with a multi-homed setup this may not resolve your issue.  My specific issue is my NIC's now went from "0x1 and 0x2" to "0x3 and 0x4" in the LANATABLE.  We apply a GPO to the ICA-TCP and RDP-TCP to force them to only utilize our 'Production' NIC which we decided was going to be the second NIC.

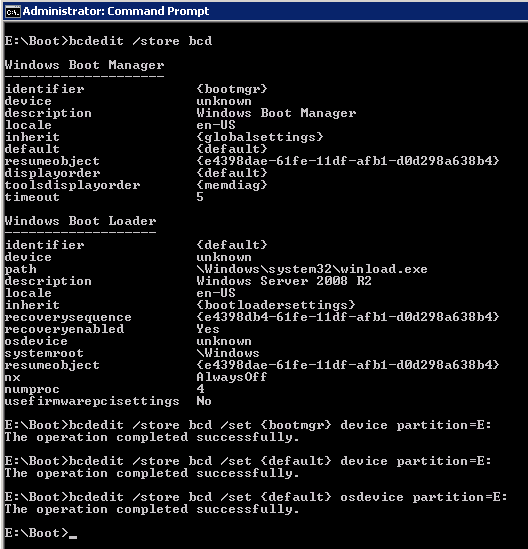
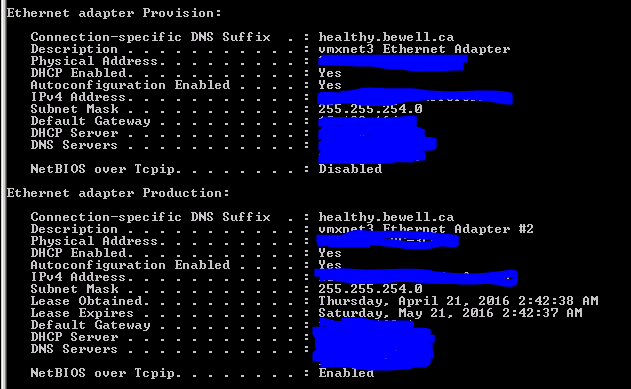
Provision = 1st Nic, Production = 2nd Nic

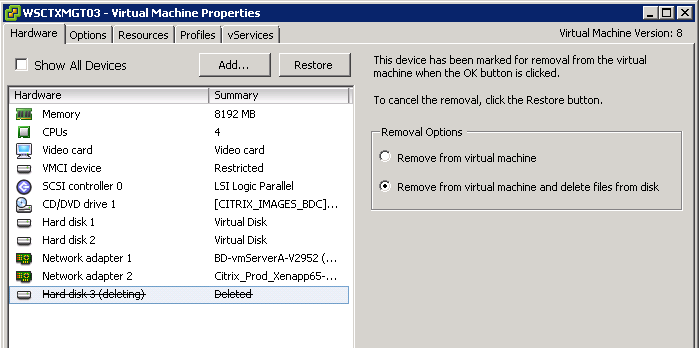
I uninstalled the ghost devices but because this change is all 'in the registry' it wasn't immediately noticeable by myself that the LANATABLE and NIC ordering had changed.  I promoted my vDisk and then tried to RDP into it:


Well...  I knew this wasn't right.  So I logged onto the server and checked the LANATABLE values:
Provision NIC
Production NIC

Provision NIC LanaID = 0x3 after the VMWare Tools upgrade

Production NIC LanaID = 0x4 after the VMWare Tools upgrade

RDP targets LanAdapter 0x1 (!?)

ICA targets LanAdapter 0x2


A couple issues popped out.   The first was that the LanaID's were wrong.  I *thought* Provision should be #1 and Production should be #2, but we apply our LanAdapter ID's via GPP so these values are correct for our other systems.  I know both RDP and ICA need to be locked to the Production NIC and the order is *correct* but I'm a bit confused to why the numbers are different between RDP-TCP and ICA-TCP.

So I started on getting the issues resolved.  First, I was going to resolve RDP.  If it is targeting 0x1 that means that I need the Production NIC (VMWare Network Adapter #2) needs to be set as 0x1.  So I edit the LanaId of the Production NIC to 0x1 and the Provision NIC to 0x2.  I rebooted the box and I could RDP into it without issue.  I then checked the Remote Desktop Session Host Configuration:

This is the correct value.

OK, so RDP is set correctly and works.  I then tried to launch a Citrix application.

It failed.

It generated an event on the server:

Unable to connect to the CGP tunnel destination
Looking at the ICA Listener configuration showed me the following:

The value is wrong.  It should be #2
So the ICA-TCP listener was set to the 'Provision' NIC.  So our production traffic was not getting to it. This is the wrong value.  My first thought was the LANATABLE would make sense here...  We have the LANADAPTER key is set to 0x2 which would equal the 'Provision' NIC under this configuraiton...   So I changed the LANATABLE to be the reverse.  0x1 = Provision NIC and 0x2 = Production NIC.

The results:


Now both are wrong!

Jeez.

I reverted the LANATABLE to 0x1 = Production and 0x2 = Provision.  Again, only the RDP-TCP connection changed.  At this point the ICA Listener *must* be looking at another place...  I used Procmon to trace the registry when I opened the ICA Listener Configuration and noticed it did NOT query LANATABLE but did go through and look and query this key:

HKEY_LOCAL_MACHINE\SYSTEM\CurrentControlSet\services\Tcpip\Linkage


The BIND order is set as Production (#2 NIC) first and Provision second in this order...  To change this order you need to go to Advanced Settings and modify the connection order:

Provision *should* be the top NIC here...
So I used the arrows on the side and moved Production to be second in this order:


Rebooted and I checked the ICA Listener:

Hurray!

I then tried both RDP and ICA traffic and both now worked correctly.

So, the lesson learned here is that this registry key:

Targets the BINDING order of the NIC's.

And this registry key:

Targets the LANATABLE and the values specified within.

Tuesday, April 19, 2016

Automatically Defrag your Citrix PVS vDisks

Here is a script to automate 'offline defragging' your PVS vDisks.  Why Defrag?  It's explained nicely here.

Effects of Fragmentation on Write Cache Size
The culprit above in excessive write cache size is fragmentation. This is caused because PVS redirection is block based and not file based. The redirection to the write cache is based on the logical block level structure of the vDisk. To illustrate this, consider the scenario below.

And the script:

Tuesday, April 12, 2016

Silent Install of Citrix PVS Target Device software

Installing the Citrix PVS Target Device software via a silent, non-interactive method fails.  Various solutions involve copying files to various locations after the install but I'm curious what it's doing when it fails.  I started to automate one of my previous posts and got to the stage where I needed to silently install the target device software and my install was hanging.  It was hanging because I was getting prompted to run a custom action for the MSI install.

The logging, when we are 'stuck' is at this point:

Logging into the server and we get the notification that a something requires an action 'Interactive Services Detection'


If you run the install in a interactive user session the custom action appears to be this message:

For some reason, Citrix found it necessary to include a dialog in the installer that forces you to answer it.  When this dialog is presented in a 'silent' install it requires interactivity to continue so the install stops until it is dealt with.

So, why is this dialog appearing?  It is appearing because CFSDEP2 service was not uninstalled cleanly and the installer requires it removed for a clean install.

When uninstalling the software silently you also get a 'Interactive Services Detection' dialog.  For whatever reason though, the uninstall dialog doesn't halt the process.

What is triggering the 'interactive services detection' on uninstall and is it the cause of our CFSDEP2 not being removed?

When doing an interactive uninstall this is a screenshot of all the actions that it executes:


And you can very clearly see it deletes the CFSDEP2 file system filter driver.


What does it look like when run silently?


The interactive services detected prompts on uninstall (UI0Detect.exe) appears to be caused by 'runonce.exe' and the 'grpconv.exe' programs.

Is our CFSDEP2 service deleted when run silently?

It was not deleted.  Is the runonce.exe utility the cause of our CFSDEP2 service not being removed?


It is not.  The CFSDEP2 service is removed *before* the runonce.exe utility it executed.  So something else is triggering it's removal.

Examining the cfsdep2.sys file in the C:\Windows\system32\drivers reveals that the driver was not uninstalled with the Citrix PVS Target Device software.

It turns out that file system filter drivers can be installed and uninstalled using the command line.
Uninstall:

Install:

So, we should just be able to add a 'Invoke-command' and execute it, right?
I tried installing and uninstalling with both WMI and Invoke-Command:

Neither command worked remotely.  I could see rundll32.exe executing and exiting with status "0" which implies success.  But the commands themselves didn't *actually* work.  When I executed the uninstall remotely neither the CFSDEP2.SYS file was deleted nor was the service uninstalled.  Doing a procmon.exe I could see that the supplemental 'runonce.exe' and 'grpconv.exe' were not run.  The reverse was true for the install as well, the CFSDEP2.SYS was not present and the service was not installed, but the exit code was "0".  So we can't trust the exit code, we need to manually check to see if the files and service are present.

So what's happening?  It turns out, for some reason, that the file system filter driver install/uninstall *requires* an interactive session to complete successfully.  What is an interactive session you could use?  The SYSTEM account.  I was hoping to create a purely native script with no outside dependencies but PSEXEC will be required.  Elevating permissions in a remote powershell session is very difficult and maybe one day I'll spend some time figuring it out and documenting it, but at this point I cheaped out and decided to use psexec.exe.  To get the install/uninstall to execute remotely, you can use psexec.exe with the following lines:


Or, since we are now running under the interactive SYSTEM context, we can just use the uninstall command:

And the install executes successfully as well under the interactive SYSTEM context:

Wednesday, April 06, 2016

ConvertFrom-MCLI for PVS 7.6 POSH module

Martin Zugec made a POSH script to convert output from mcli.exe to a PowerShell object, but his script fails with the new PVS 7.6 POSH module.  From looking at his script he is trying to key on 'spaces' to set the properties of the objects.  MCLI.exe outputs the properties with spaces.  PVS 7.6 POSH module fails because it doesn't format it's output as spaces.

MCLI.EXE output:

POSH module output:

Notice the subtle difference? No spaces.

To get Martin's original script working we need to change the script to look for another character we can key on. Fortunately(?) it *appears* that the PVS POSH module outputs properties to start with a lower case letter. If we modify his script here:
To this:
It now outputs properties correctly from the PVS POSH module:


The full modified script is here:

Tuesday, April 05, 2016

Citrix Provisioning Services - Updating VMWare Tools and Target Device software -- with all native tools

  1. Prerequistes

Step
Detail
2 servers:
  1. Staging server with Windows 2008 R2 SP1
  2. VMWare machine configured identically to your PVS target devices (BLD server)
‘Windows Server Backup’ feature installed on the staging server
The Citrix utility ‘CVHDMOUNT.EXE’ is installed on the staging server
‘Backup’ space (approx. 100GB)
VMWare VMDK hard disk of a greater size than the PVS disk:
<


Copy and install required drivers on staging server


Step
Detail
From a Windows Server, browse to a server with Citrix Provisioning Services installed on it.

Copy the drivers folder and CVhdMount.exe to the server

Open the drivers folder, right-click on cfsdep2.inf and select “Install”


Open Device Manager, right-click the computer name and choose “Add Legacy Hardware…”
Select “Next”
Select “Install the hardware that I manually select from a list (Advanced)” and click “Next”
Click “Next”
Click “Have Disk…”
Click “Browse” and go to the “drivers” folder and select “cvhdbusp6.inf” and click “Open”
Click “OK”
Ensure “Citrix Virtual Hard Disk Enumerator PVS” is listed and click “Next”
Click “Finish”


Setup VMWare virtual disk

Step
Detail
Open the “VMWare vSphere Client”

Right-click on the server you want to do the cloning on and click ‘Edit Settings…’
Under the ‘Hardware’ tab, click ‘Add…’

Select ‘Hard Disk’ and click ‘Next’
Select ‘Create a new virtual disk’ and click ‘Next’

Set the ‘Disk Size’ to be greater than the size of the VHD file, select the ‘Disk Provisioning’ options you require, select the ‘Location’ you want to store the disk and remember where it is stored.  You will need this location soon.  Click ‘Next’
Click ‘Next’
Click ‘OK’
Format the disk and set it as active

  1. Clone VHD to VMDK

      1. Backup Citrix vDisk

Step
Detail
RDP into the staging server and mount the VHD file you want to update:
Cvhdmount.exe –p 1 \\server\share\vDisks-XenApp\XenApp65Tn01.13.avhd

Open Disk Management and confirm your Citrix VHD is mounted and the new VMWare disk is present

Open ‘Windows Server Backup’
Click ‘Backup Once…’
Select ‘Different options’ then ‘Next’
Select ‘Custom’ than ‘Next’
Select ‘Add Items’
Select the PVS disk and click ‘OK’
Click ‘Next’
Select ‘Local drives’ and click ‘Next’
Select the ‘Backup Destination’ and click ‘Next’
Click ‘Backup’
Wait for the backup to complete
Click ‘Close’


      1. Recover backup to VMDK

Step
Detail
Click ‘Recover’
Select ‘This server’ and click ‘Next’
Click ‘Next’
Select ‘’Volumes’ and click ‘Next’
Select the checkbox beside the volume and choose the ‘VMDK’ for the destination volume and click ‘Next’
Click ‘Yes’
Click ‘Recover’
Wait for the Recovery to finish
Click ‘Close’


      1. Fix BCD file for VMDK

Step
Detail
Unmount the Citrix vDisk.  Cvhdmount -U 0
In the command prompt, switch to the ‘Destination’ drive and check the BCD file:

Notice there are 3 entries that need to be corrected.
Execute the following commands, substituting the ‘E:’ for the proper drive letter:

bcdedit /store bcd /set {bootmgr} device partition=E:
bcdedit /store bcd /set {default} device partition=E:
bcdedit /store bcd /set {default} osdevice partition=E:

Confirm the BCD file now contains the correct entries:


      1. Configure BLD Virtual Machine and attach the VMDK

Step
Detail
Open the vCenter console, select the staging server and ‘Right-click’ and select ‘Edit Settings…’
Select the VMDK file, note the path of the Disk File and click ‘Remove’
Under ‘Removal Options’ select ‘Remove form virtual machine and click ‘OK’
Select the associated BLD server of this vDisk and right-click and select ‘Edit Settings…’  In this example, the vDisk I am modifying is XenApp65Tn01 which is associated with BLD server WSCTXBLD351T
Click ‘Add…’
Select ‘Hard Disk’ and click ‘Next’
Select ‘Use an existing virtual disk’ and click ‘Next’
Select ‘Browse’
Navigate to the path noted earlier, select the disk and click ‘Open’
Click ‘Next’
Click ‘Next’
Click ‘Finish’
Click ‘OK’
      1. Disable CDROM attachment on bootup

Step
Detail
Select the associated BLD server of this vDisk and right-click and select ‘Edit Settings…’  In this example, the vDisk I am modifying is XenApp65Tn01 which is associated with BLD server WSCTXBLD351T
Select the ‘CD/DVD drive 1’ and ‘Uncheck’ the ‘Connect at power on’ and click OK


Start the VM and uninstall the target device software

Step
Detail
Right-click on the VM and select “Power > Power On”
Right-click on the VM and select “Open Console”
Login to the VM once it boots
Click “Start”
Click “Control Panel”
Click “Program and Features”
Click on the “Citrix Provisioning Services Target Device x64”
Right-click and choose “Uninstall”
Click “Yes”
Click “OK”
Wait for the uninstall to complete then restart the computer


Upgrade VMWare Tools

Step
Detail
Login to the VM once it boots
Browse to the VMWare Tools install and open ‘setup64.exe’

Select ‘Next’
Select ‘Custom’ and click ‘Next’
Ensure the ‘NSX’ options are set to ‘Entire feature will be unavailable’ and click ‘Next’
Select ‘Close the applications and attempt to restart them’ and click ‘OK’
Click ‘Finish’
Click ‘Yes’ to restart


Install new Citrix Provisioning Services Target Device software


Step
Detail
Login to the VM once it boots
Browse to the share that holds the updated software and open ‘PVS_Device_x64.exe’
Click ‘Install’

Click “Next”
Select ‘Acknowledged’ and click ‘Next’
Choose “I accept the terms in the license agreement” and click “Next”
Click “Next”
Click “Next”
Select ‘Complete’ and click ‘Next’
Click “Install”
Uncheck “Launch Imaging Wizard” and click “Finish”
Click “Yes” To restart the computer.
      1. Remove VMWare Disk from BLD server

Step
Detail
Right-click the VM and select ‘Edit Settings…’
Select the VMDK disk, note the ‘Disk File’ path and click ‘Remove’
Ensure ‘Remove from virtual machine’ is selected and click ‘OK’
Select the CD/DVD Drive and check the ‘Connect at power on’ box and click ‘OK’


  1. Clone VMDK to VHD

      1. Backup VMWare Disk

Step
Detail
Right-click on the staging server and select ‘Edit Settings…’
Select ‘Add…’
Select ‘Hard Disk’ and click ‘Next’
Select ‘Use an existing virtual disk’ and click ‘Next’
Click ‘Browse’ and select the disk you noted earlier
Click OK
Click ‘Next’
Click ‘Next’
Click ‘Finish’
Click ‘OK’
RDP into the staging server, browse the backup drive and delete the contents of ‘WindowsImageBackup’

Open Disk Management and confirm your VMDK is mounted

Right-click on the VMDK and select ‘Shrink Volume…’
Enter a number to shrink the partition so it is *smaller* then your Citrix VHD disk size

NOTE If you do NOT shrink the partition you will be unable to restore the partition to the smaller Citrix VHD file.
Confirm the shrink worked successfully
Open ‘Windows Server Backup’
Click ‘Backup Once…’
Select ‘Different options’ then ‘Next’
Select ‘Custom’ than ‘Next’
Select ‘Add Items’
Select the VMDK disk and click ‘OK’
Click ‘Next’
Select ‘Local drives’ and click ‘Next’
Select the ‘Backup Destination’ and click ‘Next’
Click ‘Backup’
Wait for the backup to complete
Click ‘Close’
Go to the vCenter console and Right-click on the staging server and select ‘Edit Settings…’
Select the VMDK used for updating VMWare Tools/Target Device software ‘’ and click ‘Remove’
Select ‘Remove from virtual machine and delete files from disk’


      1. Recover backup to VMDK

Step
Detail
RDP into the staging server and mount the VHD file you want to update:
Cvhdmount.exe –p 1 \\server\share\vDisks-XenApp\XenApp65Tn01.13.avhd

Open ‘Windows Server Backup’
Click ‘Recover’
Select ‘This server’ and click ‘Next’
Click ‘Next’
Select ‘’Volumes’ and click ‘Next’
Select the checkbox beside the volume and choose the ‘Citrix vDisk’ for the destination volume and click ‘Next’
Click ‘Yes’
Click ‘Recover’
Wait for the Recovery to finish
Click ‘Close’


      1. Fix BCD file for PVS vDisk

Step
Detail
In the command prompt, switch to the ‘Destination’ drive and check the BCD file:

Notice there are 3 entries that need to be corrected.
Execute the following commands, substituting the ‘E:’ for the proper drive letter:

bcdedit /store bcd /set {bootmgr} device partition=E:
bcdedit /store bcd /set {default} device partition=E:
bcdedit /store bcd /set {default} osdevice partition=E:

Confirm the BCD file now contains the correct entries:


This process could be scripted to make it less manual, faster, and less error prone, but because of the frequency we actually do these type of updates, I have just created a manual document for now.